

Stencil Techniques
This post which includes a video demostrates many stencil techniques that I showcase with Altenew stencils. I really hope you like the cards and give the techniques a try. Step by step instructions for each technique is detailed below - enjoy!
Do check out the video below.
Gallery of Cards Created


Disclosure: Where available I use compensated affiliate links which means if you make a purchase, I receive a small commission at no extra cost to you. Thank you so much for your support!
Before I get into the details into the individual cards, please note that I use Neenah Solar White 80lb cardstock and watercolour paper for the cards. You need to experiment and ascertain the correct ‘sandwich’ for your embossing machine to emboss a stencil. I have Gemini Junior machine and the ‘sandwich’ I use is - clear plate, plastic shim, metal shim, stencil, card, purple mat, and clear plat. Tip: The card must be against the purple mat and the stencil should be placed on the back of the card panel to achieve and embossed image rather than a debossed image. If this does not work, flip stencil and try again, or add a shim of a card. Careful not to force it as you may break your plates.
Key tools that help with stencilling are as follows:
Make Art-Stay-tion (to hold card and stencil in place)
Satin Masking Tape (if not using Make Art-Stay-tion or when using messy mediums, such as embossing paste)
Large blending brush (one brush for each colour family)
Small blending brush (one brush for each colour family)
Mini blending brush (one brush for each colour family)
Detail blending brush (one brush for each colour family)
Stamp shammy ( to wipe stencils and work surface to avoid colour contamination)
Repositional Adhesive, Pixie Spray (only required for more intricate detailed stencils)
Technique #1 - Stencil & then emboss

Place Lacy Tile stencil on Neenah Solar White 80lb cardstock. Secure with Satin Masking Tape or secure with magnets on Make Art-Stay-tion. Use small blending brushes and apply ink from the Rainbow Prism set (all but Parrot) on the card panel.
Attach the card panel to Lacy Tile stencil and run through embossing machine following the ‘sandwich’ detailed above. Cut down panel to slightly smaller than card base, so there is a border against the black card base. Back card panel with fun foam and attach to card base with double-sided tape.
Stamp sentiment ‘make a wish’ from Sentiment Strip Stamp with clear embossing ink after treating black card with anti-static powder. Sprinkle Pure White Embossing Powder and melt embossing powder with heat tool.
Trim sentiment, layer with black card strips and attach to card front using liquid glue. Embellish with gems using gem picker tool and liquid glue with fine tip to finish card..

Same as technique #1, except for colours and sentiments.
Ink colours used are Gray Denim, Grape Agate, & Cloudy Sky and the sentiment, ‘love & hugs’ from Dazzling Dahlia stamp set is stamped on light blue cardstock with Obsidian Pigment Ink after treating cardstock with anti-static powder. Sprinkle Crystal Clear Embossing Powder and melt embossing powder with heat tool.
Die cut sentiment with a circle die, layer with scrap circle die cuts and attach to card front using liquid glue. Embellish with gems using gem picker tool and liquid glue with fine tip to finish card.
Technique #2 - Stencil, emboss, & lightly ink blend with same colours

Same as technique #1 except for the following: (1) all colours, including Parrot, from the Rainbow Prism set is used. Also after embossing with the Lacy Tile stencil, using a small blending brush, the same colours that were applied through the stencil was lightly applied on the card panel.
Sentiment is from Sentiment Strips 3 Stamp set.
Technique #3 - ‘Stamping’ with ink left on stencil, faux watercolour

With the ink remaining on the Lacy Tile stencil from Technique #1 (first card), use Fine Mister, spray a couple of times on the stencil with ink on it, then apply to watercolour paper, like a stamp. Place a scrap paper on the stencil and gently press into the watercolour paper, being careful not to shift the stencil. This would create a faux watercolour impression on the watercolour paper.
Trim watercolour paper to slightly smaller than card base so there is a slim border around the card panel with a guilottine. Place the ‘h’ and ‘i’ from the Bold Alphabet die set on the bottom of the trimmed card panel, secure with satin masking tape, and run through die cutting machine.
Run through ‘h’ and ‘i’ using Emerald cardstock from Sea Shore Gradient Cardstock Set for another three times and adhere the layers of ‘h’ and ‘i’ with liquid glue.
Place card panel in stamping platform and treat with anti-static powder. Stamp sentiment ‘have a super day’ from Sentiment Strips 2 Stamp set with Obsidian Pigment Ink. prinkle Crystal Clear Embossing Powder and melt embossing powder with heat tool.
Attach card panel to card base with double-sided tape and then affix layered ‘h’ and ‘i’ to spell ‘hi’ to card front with liquid glue. Embellish with gems using gem picker tool and liquid glue with fine tip to finish card.
Technique #4 - Emboss & lightly ink blend

Place Lacy Tile stencil on Neenah Solar White 80lb cardstock and secure with Satin Masking Tape. Run through embossing machine following the ‘sandwich’ detailed above. Utilise large blending brush and apply Blush and Rouge inks on the embossed card panel with a light hand. For the centres of the individual circular patterns, use a small blending brush to apply more concentrated pigment.
Cut down card panel with a guilottine to slightly smaller than the black card base so a uniform black border is visible. Attach embossed card panel to fun foam with double-sided tape and affix to card base.
Stamp sentiment ‘happy birthday’ from Label Love Stamp with Obsidian Pigment Ink on white card. Sprinke with Crystal Clear Embossing Powder and melt embossing powder with heat tool. Trim sentiment and back with a three layers using liquid glue of trimmed cardstock for dimension and affix to card front. Use a T-ruler to ensure that sentiment is adhered straight on card front.
Embellish with gems using gem picker tool and liquid glue with fine tip to finish card.
Technique #5 - Deboss & lightly ink blend

Place Lacy Tile stencil on the back of the Neenah Solar White 80lb cardstock and secure with Satin Masking Tape. Run through embossing machine following the ‘sandwich’ detailed above. Utilise large blending brush and apply Olive and Dusk inks on the embossed card panel with a light hand.
Cut down card panel with a guilottine to slightly smaller than the black card base so a uniform black border is visible. Attach embossed card panel to fun foam with double-sided tape and affix to card base.
Stamp sentiment ‘Hola’ from Hello Friend Stamp with Obsidian Pigment Ink on white card. Sprinke with Crystal Clear Embossing Powder and melt embossing powder with heat tool. Die cut sentiment with an additional three layers of white cardstock. Attach all the circles together using liquid glue for dimension. Cut some metallic thread, roll it up and adhere to back of sentiment before it is adhered to card front. Use a T-ruler to ensure that sentiment is adhered straight on card front.
Embellish with gems using gem picker tool and liquid glue with fine tip to finish card.
Technique #6 - Ink blend, emboss with stencil, & lightly ink blend

Apply Bamboo and Parrot ink ink onto Neenah Solar White 80lb cardstock. Place Leaf Bed Stencil on the back of the inked card panel and secure with Satin Masking Tape. Run through embossing machine following the ‘sandwich’ detailed above. Utilise large blending brush and apply Moss and Dusk inks on the embossed card panel with a light hand.
Attach embossed card panel to fun foam with double-sided tape and affix to card base.
Stamp sentiment ‘hello you’ from Dazzling Dahlia Stamp with Clear Embossing Ink on teal card. Sprinke with Pure White Embossing Powder and melt embossing powder with heat tool. Die cut sentiment with an additional three layers of white cardstock. Attach all the circles together using liquid glue for dimension. Die cut leaves from Just Leaves die set in white and teal card. Affix leaves die cuts to card front with liquid glue. Use a T-ruler to ensure that sentiment is adhered straight on card front.
Embellish with gems using gem picker tool and liquid glue with fine tip to finish card.
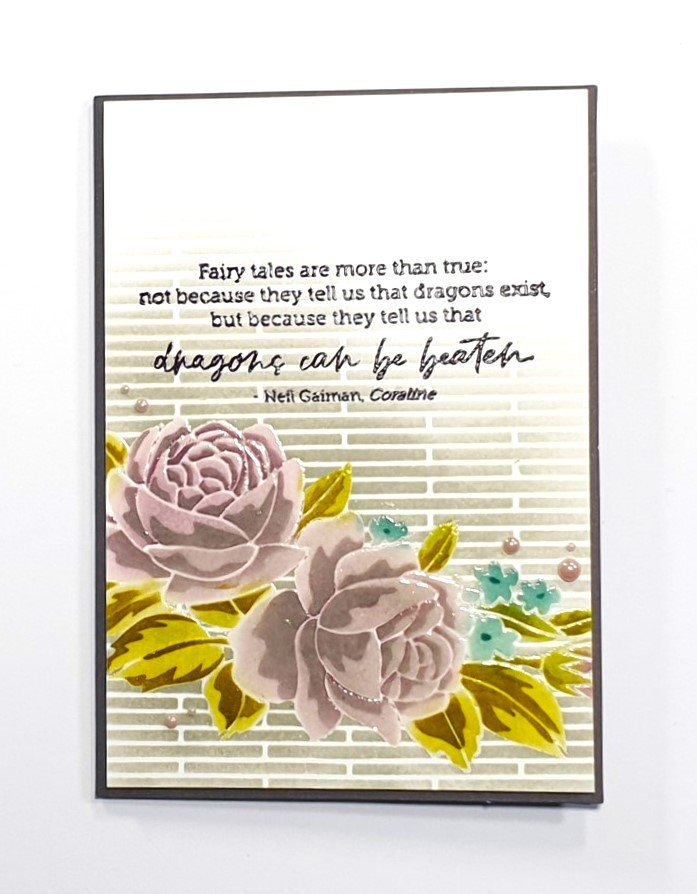
Technique #7 - Emboss resist stencilling

The Sweet Spring Stencil has two stencil images, the silhouette image and the detailed image. Start with stencilling on the silhouette image onto Neenah Solar White 80lb cardstock using small blending brush, mini blending brush, and detail blending brush with Pastel Sunrise, Bamboo, and Dew Drops inks. Then flip the stencil to the detailed stencil image and apply Canyon Clay, Olive, and Teal Cave inks.
Tip: Keep hold of the backing from adhesive sheets. Use these to protect the rest of the card when stencilling particular images. The non-porous side can be wiped and reused - a little recycling in the craft room is not a bad thing:)
Align the silhouette image of the stencil on the stencilled image and apply clear embossing ink to the image. Remove stencil and sprinkle Crystal Clear Embossing Powder, then melt embossing powder with a heat tool. This heat embossed image will act as an emboss resist to any ink applied onto it. Place the Narrow Brick Stencil onto the image and apply Silver Lake ink with a small blending brush.
Tip: To check whether the ink is dry, treat area to be stamped with anti-static powder and sprinkle Crystal Clear Embossing Powder over the area to see if it sticks to the card. If it does, the ink is not dry yet, and if it does not, the area is ready to be stamped and heat embossed.
Once the ink dries, stamp sentiment from Well-Read Sentiment Stamp set with Obsidian Pigment Ink, sprinkle with Crystal Clear Embossing Powder, then melt embossing powder with a heat tool.
Cut down card panel with a guilottine to slightly smaller than the black card base so a uniform black border is visible. Attach embossed card panel to fun foam with double-sided tape and affix to card base.
Embellish with gems using gem picker tool and liquid glue with fine tip to finish card.

Same technique as card above, except that a different sentiment from the same stamp set, Well-Read Sentiment Stamp set, was used.

Same technique as card above, except for the following: Ink used is Pale Mauve, Amethyst, Misty Moor, Sea Forest, Misty Morning, and Nimbus. Also a different sentiment from the Well-Read Sentiment Stamp set, was used.
Technique #8 - Stamp with stencil & heat emboss

Ink Lacy Tile stencil with clear embossing ink and place onto Neenah Solar White 80lb cardstock. Secure stencil and cardstock with Satin Masking Tape and run through embossing machine following the ‘sandwich’ detailed above. This will ensure that the clear embossing ink is properly pressed onto the cardstock. Remove stencil, sprinkle Antique Gold Embossing powder and melt embossing powder with a heat tool.
Cut down card panel with a guilottine to fit card base. Attach heat embossed card panel with double-sided tape to card base.
Die cut main sentiment ‘hello’ with Fine Alphabet Dies and sub-sentiment with Sentiment Strips 2 Stamp set. Embellish with gems using gem picker tool and liquid glue with fine tip to finish card.
Technique #9 - Stamp with stencil, heat emboss, & watercolour

Same technique as card above, except for the following: Use Antique Silver Embossing Powder and the sentiment is from Well-Read Sentiment Stamp set. Also the card used is watercolour paper.
After heat embossing, apply a wash of the watercolour pigment using the 24 pan set artists’ watercolor set.
Place vellum in stamping platform and treat with anti-static powder. Stamp sentiment with Obsidian Pigment Ink, sprinkle with Crystal Clear Embossing Powder and melt embossing powder with heat tool. Note: Ink takes a long time to dry on vellum, so heat embossing with embossing powder, sets it and avoids ink smearing.

This card ustilises the same technique as the card above, except for the following: Leaf Bed Stencil and Crystal Clear Embossing powder is used over watercolour paper.
After heat embossing, apply pigment to the leaves using the 24 pan set artists’ watercolor set. A darker pigment is applied closer to the stem of the leaf. Sentiment ‘you’re amazing’ is from the Sentiment Strips stamp set.
Technique #10 - Stamp with script stamp, stamp with stencil, & watercolour

Stamp Hero Arts Old Writing stamp onto watercolour paper with Permanent Black Dye Ink. Then follow steps in Technique #9 above, using Crystal Clear Embossing powder with 24 pan set artists’ watercolor set.
Die cut detail of sentiment ‘feel better soon’ three times from black cardstock and layer together with liquid glue. Then die cut the outline of the sentiment with vellum. Attach the layered detail ‘feel better soon’ onto the vellum outline using liquid glue.
Technique #11 - Stencil with embossing paste, air dry

Place Leaf Bed Stencil on watercolour paper and secure with satin masking tape. Spread embossing paste with palette knife and leave embossing paste aside to air dry.
Then use large blending brush to apply dye ink pigment onto dried embossing paste card panel. The dye inks used are Winter Lake, Marigold, and Honey Drizzle. Apply ink lightly and blend between colours. Attach card panel to card base with double-sided tape.
Always Be Kind Stamp & Be Kind Die Bundle is used for the sub-sentiment, ‘and shine on’ and main sentiment, ‘be kind’ respectively. The outline of the ‘be kind’ die is die cut in vellum. Die cut the detail ‘be kind’ die with dark blue card and attach to the vellum outline with liquid glue. Stamp sentiment ‘and shine on’ with Clear Embossing Ink on dark blue card. Sprinke with Pure White Embossing Powder and melt embossing powder with heat tool. Cut down the stamped sub-sentiment and attach to card front using liquid glue. Use a T-ruler to ensure that sentiment is adhered straight on card front.
Embellish with gems using gem picker tool and liquid glue with fine tip to finish card.
Technique #12 - Stencil with embossing paste, dry with heat tool

Place Leaf Bed Stencil on watercolour paper and secure with satin masking tape. Spread embossing paste with palette knife and use heat tool to dry embossing paste. The embossing paste will bubble and dry with a textured mixed media look.
Apply clear water with a flat brush on the card panel and add pigment from 24 pan set artists’ watercolor set. This would be the ‘wet on wet’ technique, blending a smooth transition between the colours. With watercolours, you need to layer the pigment. Let panel dry and add some more pigment if you want a more vibrant colour. I did a couple of layers of colour for the card above.
Place a strip of vellum (that is long enough to wrap around the card panel in a portrait orientation) in a stamping platform. Place sentiment from Well-Read Sentiment Stamp set on vellum centre and ‘pick up’ sentiment with stamping platform door. Treat strip of vellum with anti-static powder. Ink sentiment stamp on staming platform door with Obsidian Pigment Ink, swing door shut and stamp on vellum. Sprinkle Crystal Clear Embossing Powder on stamped sentiment and melt embossing powder with heat tool. Tip: Heat tool for at least 30 seconds before taking it to the vellum. Keep the heat tool moving so the vellum does not warp too much.
Wrap vellum on lower third of the card panel and secure with double-sided tape behind the card panel. Attach card panel to card base with double-sided tape. Embellish with gems using gem picker tool and liquid glue with fine tip to finish card.
Technique #13 - Move stencil around, & ink blend over stencil

Place Modern Circles stencil on Neenah Solar White 80lb cardstock (card used measured 6” by 6”, size of stencil) and secure with magnets on the Make Art-Stay-tion. As multiple colours are used in each stencil opening, mini blending brushes come in really handy to apply ink to smaller areas. Tip: Have a blending brush for each colour family. Clean brush on scrap paper or dry cloth before applying a new colour from the colour family to minimise colour contamination.
Colours applied on card are Chamomile, Persian Blue, Parrot, and Lagoon. Move stencil around until all of the card is covered with images from the Modern Circles stencil. Cut stencilled card panel to slightly smaller than card base.
Once ink dries, stamp ‘sweet’ in Obsidian Pigment Ink using alphabet stamps from Mega Brush Alpha Stamp on card panel as the main sentiment. Then stamp sub-sentiment ‘birthday wishes’ from Sentiment Strips Stamp set in Obsidian Pigment Ink as well. Sprinkle Crystal Clear Embossing Powder on the main and sub-sentiment, and melt embossing powder with a heat tool.
Use a black sharpie marker and a T-ruler and ink the edges of the card panel, giving it a faux black matt look. Attach fun foam to back of card panel with double-sided tape and attach to green card base. Embellish with gems using gem picker tool and liquid glue with fine tip to finish card.

This card has a strip of the stencilled card panel from the above card. Back strip of stencilled card panel with fun foam using double-sided tape.
Place Halftone stencil on navy card base and apply Winter Lake ink with a small blending brush. Attach strip of stencilled card panel with fun foam to right of card base using double-sided tape.
Die cut ‘Hello’ from yellow card using Bold Greeting die. Die cut the sentiment a few times so it can be layered together for dimension. Take into cosideration tha the ‘lo’ at the end of the sentiment, ‘Hello’ will be on the raised strip of stencilled card and thus reduce the layers on that part of the sentiment. Then attach die cut, ‘Hello’ on card front with liquid glue. Embellish with gems using gem picker tool and liquid glue with fine tip to finish card.
Technique #14 - Double stencilling

Place Bubble Wrap stencil on Neenah Solar White 80lb cardstock and secure with magnets on Make Art-Stay-tion. Apply inks, Polar Bear, Sunray, and Blush with small blending brushes. Then place the Narrow Brick stencil on top of the Bubble Wrap stencil and apply inks, Icy Water, Chamomile, Snapdragon, and Rouge with small blending brushes.
Let inks dry and treat area to be stamped with anti-static powder. Tip: To check whether the ink is dry, treat area to be stamped with anti-static powder and sprinkle Crystal Clear Embossing Powder over the area to see if it sticks to the card. If it does, the ink is not dry yet, and if it does not, the area is ready to be stamped and heat embossed.
Insert card panel into stamping platform and align stamps from Vase Fillers stamp and sentiment stamps from Sentiment Strips 2 Stamp set and Sentiment Strips 3 Stamp set, and stamp with Obsidian Pigment Ink. Sprinkle stamped images with Crystal Clear Embossing Powder, and melt embossing powder with a heat tool.
Cut card panel to slightly smaller than card base to have a narrow border and adhere card panel to black card base with double-sided tape. Embellish with gems using gem picker tool and liquid glue with fine tip to finish card.

The steps to create this card is the same as the card above, except for the following products used: Modern Circles stencil, with inks, Bamboo, Volcano Lake, and Persian Blue; Fine Tulle stencil with inks, Parrot, Lagoon, and Sapphire. The sentiment from Bold Sentiments stamp set is stamped with Obsidian Pigment Ink and heat embossed with Crystal Clear Embossing Powder. Trim the sentiment and layer with three layers of card strips and attach to middle of card panel with liquid glue.
Use a black sharpie marker and a T-ruler and ink the edges of the card panel, giving it a faux black matt look. Attach card panel with double-sided tape and attach to green card base.
Technique #15 - Stencil shifting

Place Leaf Bed Stencil on light green cardstock and secure with magnets on Make Art-Stay-tion. Apply Firefly ink with a large blending brush. Then lift and shift the Leaf Bed stencil slightly to the right. Then apply inks, Dusk and Desert Night, with large blending brushes.
Arrange dies ‘L’, ‘O’, ‘V’, and ‘E’ from Caps Bold Alphabet Die set at the centre of the card panel to spell ‘LOVE’. Die cut and save all the internal pieces as well. Go on to die cut the letters in white card another four times. Layer them with liquid glue and place the stencilled die cut alphabets at the top of the layered die cut alphabets.
Trim the square card panel to slightly smaller than the kraft square card base. Adhere the stencilled card panel to the square kraft card base with double-sided tape. Then affix the ‘L’, ‘O’, ‘V’, and ‘E’ layered die cuts to the open die cuts on the stencilled card panel with liquid glue. Apply glossy accents to the die cut alphabets for some shine. Embellish with gems using gem picker tool and liquid glue with fine tip to finish card.

Follow the steps in the above card for the shifting stencil techniques, except for the ink colours. The colours used for the strip of card panel where the stencil shift technique was employed is Warm Sunshine, Orange Cream, and Ruby Red.
Place the Leaf Bed Stencil on kraft card base and align pattern to the stencilled card strip. This way when the card strip is adhered to the card base, the stencilled image would be continuous. Apply Sand Dunes ink on the card base with a small blending brush. Attach fun foam to the back of the stencilled card strip with double-sided tape and attach to right of card base, and ensure that the Leaf Bed Stencil pattern is continuous.
Sentiment is from Sentiment Strips 3 stamp set. Stamp sentiment ‘sending a happ hello’ on a red card after treating card with anti-static powder. Stamp with clear embossing ink, sprinkle with Pure White Embossing Powder, and melt embossing powder with a heat tool. Trim stamped and heat embossed sentiment, matt with a strip of black cardstock and attach to bottom on the stencilled card strip with liquid glue, using a T-ruler to ensure it is adhered straight. Embellish with gems using gem picker tool and liquid glue with fine tip to finish card.
Card Challenges mentioned in video
Kendra’s Card Challenge - my latest post on this challenge
Christmas Craft Creation - my latest post on this challenge
C.R.A.F.T. Challenge - my latest post on this challenge
Disclosure: Where available I use compensated affiliate links which means if you make a purchase, I receive a small commission at no extra cost to you. Thank you so much for your support!

Thank for stopping by and happy crafting!